Followers

Showing posts with label Clean & Simple. Show all posts

Friday, 7 December 2018

Rudolph

Hello all and happy Friday!

It’s time for a brand new challenge over at the Polkadoodles Challenge Blog and even though it’s Anything Goes the team are showing some creations using on the theme ‘It’s beginning to look a lot like Christmas’.

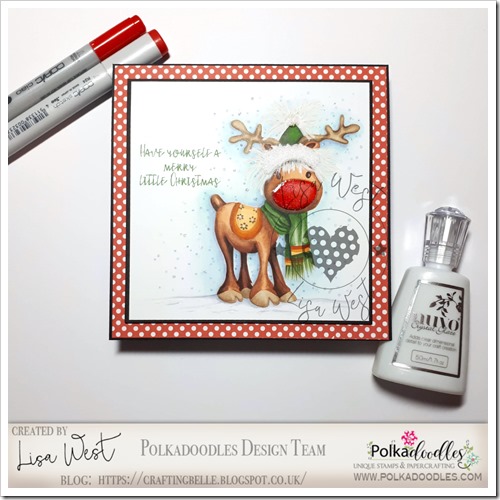
It’s getting to that time of year when time is at a premium, especially now the children have such busy social lives, so I have made a clean and simple card this week:
20181201_172151 (1)

I have used papers from the Twiggy & Toots Festive Fun Download Collection and an adorable image called Rudolph from the Winnie White Christmas Collection, which I have coloured with a mix of markers and pencils.

Supplies:

I would like to enter this card into the following challenges:


Thanks for stopping by.

Lisa

Friday, 26 October 2018

Pretty Paper

Hello all and happy Friday! It’s time for a brand new challenge over at the Polkadoodles Challenge Blog and even though it’s Anything Goes the team are showing some creations Focusing on the Paper:

Greeting of the Season (2)

For my make I have kept the design fairly simple and tried not to cover up the pretty papers. I have just added a die cut and a sentiment printed onto vellum

Supplies:

I would like to enter this card into the following challenges:


Thanks for stopping by.

Lisa

Tuesday, 11 April 2017

Butterfly Bunny

Butterfly Bunny (4)

Evening all. Just put the wee ones to bed so thought I would pop my feet up and share with you the fabulous new images Wendy has added to the All Dressed Up Etsy Shop. There is Happy 40th, 50th and 60th (you get all three images), Pretty in Plaits, Spring Walks and Butterfly Bunny:

For today’s make I got to play with Butterfly Bunny and isn’t she so cute?

Butterfly Bunny (3)

I had a play with Aqua Markers on this one.

Butterfly Bunny (1)

I could find any card to match, so I coloured the mat with the same pen as the Butterflies. 

Supplies:

Please hop over to the All Dressed Up FB Group to see some fantastic inspiration from the rest of the team.

Thanks for stopping by

Lisa

Tuesday, 28 March 2017

Mellow Yellow

Colourista Foil - Just for You (4)

Morning All! We had lovely blue skies here this morning but in the last quarter of an hour the clouds have returned and it’s looking really gloomy here. So to brighten things up I have something a little different to show you today.

I had a play with some Colorista Pencils and some fabulous Foiled Colorista Pads a few weeks back to make some samples for the shopping channel HSN.

This card uses Colorista Designer Tags 1 Pad and Colorista Pencils Sets 1 & 6

Colourista Foil - Just for You (2)

  That tag is so stunning, I thought clean and simple would show it off.

Colourista Foil - Just for You (1)

Supplies:

I would like to enter this card into the following challenges:

  •  

Thanks for stopping by

Lisa

Wednesday, 8 June 2016

Bookworm

Bookworm (1)
Afternoon all! I’m here today with the new challenge that started today over at the Crafts & Me Facebook Group. It’s the usual Anything Goes but this times optional theme is ‘Clean and Simple’.

For my Clean and Simple Card I thought I would make the most of the fabulous image and do a bit of no lines colouring. So here is todays card using Hannah Lynn’s Bookworm:

Bookworm (3)

One last picture:

Bookworm (5)

Supplies:

  • Image: Bookworm by Hannah Lynn from Crafts & Me
  • Colouring Medium: Copics
  • DP: From my scrap box
  • Card: Pink Card, Purple Card and Copic X-Press It Blending Card 
  • Embellishments: Doodling, Gems and Glitter Glue 

Don’t forget to hop over to the Crafts & Me Facebook Group and check out the creations from the rest of the team.

Thank you for stopping by

Lisa

Tuesday, 22 March 2016

Easter Bunny

Easter Bunny (1)

Afternoon all! Not sure if it’s me or Mr Blogger but this post was sat in my drafts folder Sad smile

Morning All. Hope you have a good weekend planned, we are just chilling out and pottering around the house and garden.

Anyhoo, back to the point of my post and over at A Gem of a Challenge it’s the Pinks turn to host the challenge and we have  a fabulous theme of ‘Easter’

I have used Easter Bunny and I’m trying out a more CAS look:

Easter Bunny (4)

I trying to master using my patterned papers in a more simple less layered way, I’m pretty pleased with how this turned out.

Supplies:

  • Image: Easter Bunny from Pink Gem Designs 
  • Colouring Medium: Copics
  • Card: Lilac Card, Lime Card and Copic X-Press It Blending Card
  • DP: First Edition ‘Spring Drop’ 6x6 Paper Pad
  • Sentiment: Written on Computer
  • Embellishments: Ribbon, Doodling and a Pearl Flower Pearls

Thanks for stopping by

Lisa

Friday, 8 January 2016

Going on a Walk

Going on a Walk (4)

Hello All! Yesterday was my turn to share some Elisabeth Bell love over on the Digi Bells Blog, but doh! I forgot to post here on my own blog….I’m beginning to think my brain may have stayed in 2015!!

Today’s card uses Going on a Walk: 

Going on a Walk (5)

Supplies:

  • Image: Going on a Walk by Elisabeth Bell 
  • Colouring Medium: Copics
  • Card: Yellow and Kraft Card and Copic X-Press It Blending Card
  • Stamps: Sentiment from Clearly Besotted and alpha stamps from Hobbycraft
  • Embellishments: Pearls and doodling

Thank you for stopping by

Lisa

Friday, 25 September 2015

Greeting Fairy

Greeting Fairy (3)

Morning all. Thank goodness it’s the end of a long week. Two poorly children and now I’m starting feel a bit under the weather as well…time for a peaceful weekend I think!

Anyhoo, back to the point of my post and it’s time for another Fab Friday post over at the Tiddly Inks Challenge Blog.

I’ve used Willow the Greeting Fairy 

Greeting Fairy (4)

I’ve gone a bit clean and simple this time, partly because I went a little bright with my choice of hair colour!!

Supplies:

  • Image: Willow the Greeting Fairy from Tiddly Inks 
  • Colouring Medium: Copics
  • Card: Navy and Aqua card and Copic X-Press It Blending Card
  • Ink: Milled Lavender and Broken China Distress Inkpads
  • Embellishments: Sequins and Perfect Pearls Mist

I would like to enter this card into the following challenges:

Have a great weekend and thank you for stopping by

Lisa

Wednesday, 23 September 2015

#HB2U

Afternoon All. Just a quick post as I’m about to do the school run. I spent a bit of time on Monday Blog Hopping, which I haven’t had the chance to do much of recently. I was inspired by these weeks challenge at Less is More where the theme is technology.

#HB2U (3)

I had this little envelope on my desk that I cut out for another project but didn’t end up using and I thought it would work well for an email symbol and then I added the little wooden letters to show a Happy Birthday Message.

Supplies:

  • Card & Paper: Kraft, Cream and Blue Card and Vellum
  • Dies & Punches: MFT By the Letter Dies and mini envelope die from Whimsy Stamps.
  • Embellishments: Studio Calico Wooden Alphas

I would like to enter this card into the following challenges:

Thanks for stopping by

Lisa

Monday, 7 September 2015

50 Shades of Grey

Fayes Sunflowers (3)

Afternoon all……it wasn’t quite 50 shades but I sure managed to get quite a few greys in there when I was colouring!! I have made this for the challenges over at Make It Crafty where the CAS challenge is Black and White and the Make it Colourful challenge is Shades of Black.

Here is the full card using the adorable Faye's Sunflowers:

Fayes Sunflowers (5)

All that hair was a big big challenge but I took it a curl at a time and I’m really pleased with how it turned out.

Supplies:

  • Image: Faye’s Sunflowers from Make It Crafty 
  • Colouring Medium: Copics
    • Skin: W5, W3 , W1 and W00
    • Eyes: C7, C5 and B60
    • Hair: C9, C7, C5 and C3
    • Dress, Hat and Lipstick: BV29, BV25, BV23 and BV20
    • Sunflowers: W9, W7, W5, W3 and W1 (stems are C5, C3 and C1)
    • Shadow: W5, W3, W1 and W00
  • Card: Black, Grey and Light Grey Card and Copic X-Press It Blending Card

Thanks for stopping by

Lisa

Tuesday, 4 August 2015

Purfect Birthday

Purfect Birthday Wryn (3)

Morning All. We are enjoying our holiday and had a lovely day on Anglesey yesterday. Not sure what we are doing today, but it will probably be something to tire the kids out, lol!

Anyhoo, it’s time for Tiddly Tuesday over at the Tiddly Inks Challenge Blog and we have a new challenge for you. Our theme this time around is Paws for Thought and here is my card:

Purfect Birthday Wryn (2)

I have used Purfect Birthday Wryn and was in a completely CAS mood when I made this. The layout was actually left over from another project I was working on but when I printed Wryn out I knew it was perfect for her.

Supplies:

  • Image: Purfect Birthday Wryn  by Tiddly Inks 
  • Colouring Medium: Copics
  • DP: MME (a scrap but I can’t remember which pad it was from)
  • Card: Burgundy and White Card and Copic X-Press It Blending Card
  • Sentiment: Comes with the image
  • Dies & Punches: Spellbinders Plain Circle Dies
  • Embellishments: Glitter glue and wooden hearts

Thanks for stopping by

Lisa

Thursday, 16 April 2015

Geranium – Little Claire Blog Project

Geranium Flower (6)

Morning All. If you are reading this Mr Blogger has played nice and has published this scheduled post. We are enjoying a few days away before my eldest has to go back to school next week. Hopefully (as the weather men have predicted) we have some nice weather!!

It’s my turn to share a digi stamp project over on the Little Claire Blog today. I have used the Geranium Flower digi stamp to create a little set of Thank You cards. These are always handy to have on standby, by little clean and simple ones can be rustled up quite quickly if needed in a hurry!

Geranium Flower (4)

To see full details on how the card was made please hop over to the Little Claire Blog.

Supplies:

  • Image: Geranium Flower from Little Claire
  • Sentiment: Created in Word using Mistral Font 
  • Colouring Medium: Copics
      • Flowers: R59, R27, R08, R05 and R02
      • Leaves: G99, YG67, YG63, YG61, YG03, YR23, YR21 and YR20
      • Shadow around image: BG10, BG0000 and Blender pen
  • Card: Coral Core’dinations Card
  • Embellishments: Doodling and pearls.

I would like to enter this card into the following challenges:

  •  

Thanks for stopping by

Lisa

Monday, 13 April 2015

Birthday Boy

Tiddly Inks Birthday Boy (4)

Morning All. We are off for a few days holiday before the eldest munchkin has to go back to school  :-) And I’ve made sure to pack all the important things…..Copics, images to colour, pencils….lol!

Well Saturday morning I had to make a card for my Brother-In-Laws birthday and I decided to use the adorable Tiddly Inks Birthday Boy Image.

Well imagine how chuffed I was to find out Tiddly Inks are having another DT Call. I have tried before and wasn’t successful, but I love the images so I’ve just gotta have another try. I know the call was posted a few hours after I made my card so please let me know if it’s not ok to use it and I’ll happily make another card….after my holiday though!!!

Tiddly Inks Birthday Boy (3)

I’m seem to be going through a Clean and Simple (ish) phase at the moment, bet hey that’s suits a card for a man pefectly.

I have combined the image with a digi sentiment from Make it Crafty before printing. Image has been coloured with Copics and just a few embellies…..but it was a big birthday this year so I had to squeeze the ‘50’ in there somewhere ;-)

Supplies:

  • Image: Tiddly Inks Birthday Boy 
  • Colouring Medium: Copics
      • Skin: E04, E11, E21, E00, E000 and R20
      • Hair: E49, E39, E37, E35 and E33
      • Shoes: Black, C7, C5, C3, and C1
      • Ground: E25, E23 and E21
      • The above is from memory as I have lost my list, when I find it I will update.
  • Sentiment: From Make it Crafty 
  • DP: Basic Grey ‘Hey You’ 6x6 Paper Pad
  • Card: Kraft card, Turquoise card and Copic X-Press It Blending Card
  • Dies & Punches: MS Zig-Zag Border Punch, All Occassion Number dies and Sizzix Star Framelits
  • Embellishments: Bakers Twine

I would like to enter this card into the following challenges:

Thanks for stopping by

Lisa

Sunday, 12 April 2015

Wishful Asha

Wishful Asha (2)

Edited to add Copic colours now Mr Blogger is playing nicer (and I’ve found my list!)

Make it Crafty are having a Clean and Simple Design Team Call and I thought I would give it a try. I used the gorgeous Wishful Asha to make this card with a simple background.

Wishful Asha (1)

Have a few more pictures to add to show how the background was done but blogger is really playing me up today and I can’t get the pictures to load. It’s taken me about an hour to get this to post and I know I’m cutting it fine already! The pictures have now been added below.

I wanted a light background but not completely plain. I really wanted to use the pattern from a heart embossing folder but not have the raised texture. So here is how I achieved it.

  1. Place card inside embossing folder and rub with a heavy/sturdy object.DSC05309
  2. Open embossing folder (the pattern won’t show at this point). Sand all over to reveal the pattern.DSC05310
  3. Using a piece of Cut & Dry foam lightly rub with ink to highlight the pattern.DSC05311
  4. Finished result.Wishful Asha (1)

Supplies:

  • Image: Wishful Asha from Make It Crafty
  • Colouring Medium: Copics
    • Skin: E04, E11, E21, E00, E000 and R20
    • Lips: E04, RV29, RV23 and RV10
    • Eyes: B29, B24 and B05
    • Hair: E49. E29, E27, E25 and E35
    • Dress:E15, E13, YR23, YR21 and YR20.
    • Socks and T-Shirt: BV20 and BV0000
    • Flowers and shoes: V09, BV08 and V04
    • Dandelion: E43 and E41
    • Butterfly: V12, RV10 and RV000
  • Card: Kraft Card, White Linen Card, Lemon Core’dination Card and Copic X-Press It Blending Card
  • Ink: VersaMagic ‘Thatched Straw’ Inkpad
  • Dies, Punches and Embossing Folders: X-Cut Corner Rounder, Go Kreate Large Circle Dies and Sizzix Hearts Embossing Folder
  • Embellishments: Ribbon, Studio Calico Wooden Alphas and Small MDF Butterflies

I would like to enter this card into the following challenges:

Thanks for stopping by

Lisa

Saturday, 11 April 2015

Chloe with Lambs

Chloe with Lambs (4)

Morning All. We all (even the children) had a lie in this morning, so we’ve only just finished a lazy morning including a very late breakfast!! I’m here to share my latest card for the new challenge at A Gem of a Challenge. The theme this time is ‘Spring is in the Air’ so what’s more spring like than baby lambs? I’ve used the super super cute Chloe with Lambs:

Chloe with Lambs (6)

I seem to be sticking with Clean and Simple lately, although this card doesn’t have as much white space as my previous post. I just couldn’t resist this cute paper with it’s little Ladybugs.

Supplies:

  • Image: Chloe with Lambs from Pink Gem Designs 
  • Colouring Medium: Copics
  • DP: Spring Drop from First Edition
  • Card: Peach Core’dinations card and Copic X-Press
  • Stamps: Sentiment from Whimsy Stamps 
  • Dies & Punches: Go Kreate Large Oval Dies and Fiskars 3in1 Heart Corner Punch
  • Embellishments: Pearls, Small Tag, Ribbon Bow and Punched Hearts

I would like to enter this card into the following challenges:

  •  

Thanks for stopping by

Lisa

Thursday, 9 April 2015

Pati’s Kisses

Pati's Kisses (2)

Happy Thursday Everyone! I’ve been busy making the most of the good weather we have in the UK, by working in the garden. My new vegetable patch is ready to start planting things in. I’m hoping all this fresh air will help my sinus infection as well……I’m still suffering at the moment :-( On the upside only a few more days and we are having a little Holiday…wooohoo I can’t wait!

Anyhoo I’m waffling (again!!). As I’ve made a few embellished cards and things recently I was itching to do a CAS card. This one uses the Pati’s Kisses Digi Stamp from Elisabeth Bell and I’ve coloured her with Copics. I’ve even remembered to note down the colours I’ve used (the list is below :-)):

Pati's Kisses (5)

I love the finished look of the ‘No-Lines’ technique but it sure does take me a lot longer to do (that and the fact I was getting distracted watching Gray’s Anatomy!!!).

Supplies:

  • Image: Pati’s Kisses from Elisabeth Bell 
  • Colouring Medium: Copics
    • Skin: E04, E11, E21, E00, E000 and R20.
    • Hair: E29, E25, E23 and YR20.
    • Trousers: C7, BG09, BG49, BG15, BG13 and BG01.
    • Pink Clothes: R89, R85, R83 and R81.
    • Bear: E39, E37, E35 and E31.
    • Belt E29, E27, E25 and Y17.
  • Sentiment: From a Pink Petticoat digi sheet
  • Card: Turquoise card and Copic X-Press It Blending Card
  • Dies & Punches: Fiskars 3in1 Heart Corner Punch and X-Cut Corner Rounder.
  • Embellishments: Punched Hearts

I would like to enter this card into the following challenges:

  •  

Thanks for stopping by

Lisa

Monday, 16 February 2015

Birthday Girl

Birthday Girl (2)

Morning All. Whoop whoop, it’s half term here and my eldest has gone to stay with my sister and the littlest is staying with my Mum and Dad….peace and quiet, but I do have some decorating to keep me busy. I armed with a wall paper steamer and I’m not afraid to use it lol!

I like to have a stash of some CAS cards, as they are nice and light and ready to pop in the post. Here is a card I made using Birthday Girl from Whiff of Joy:

Birthday Girl (3)

I’ve used a digi sentiment that I found here on Birds Cards (sorry I lost the direct link) and merged the images in word so it looks like the candle smoke is making the words.

Best get on with the DIY, that wallpaper isn’t going to strip itself!

Supplies:

  • Image: Birthday Girl from Whiff of Joy 
  • Colouring Medium: Copics
  • Card: Red and Black Card, Copic X-Press It Blending Card
  • Dies & Punches: MS Border Punch
  • Embellishments: Stickles Glitter Glue

I would like to enter this card into the following challenges:

  •  

Thanks for stopping by

Lisa

Tuesday, 18 February 2014

Clean & Simple Chevrons

 
Hi I've been playing with the 12x12 papers from January's A Few of My Favourite Things Kit.  Here is my card using Sentiments Stamps and the Black and White Chevron Paper:


Mr Mojo seems to be taking a little vacation at the moment (methinks he maybe visiting sunnier places…lucky so and so) so I had a look at a few of my favourite challenge blogs for a good old crafty kick up the bum ;-) Boy it’s been a while since I entered a challenge, I just don’t seem to get the time, but this card was inspired by the current challenge at Less is More calling for masculine cards so before I forget I’m going to enter. 

Thanks for stopping by.
Lisa


Tuesday, 2 July 2013

A Day at the Seaside

Unfortunately the blog title is where I would like to be right now and not where I am. We certainly haven’t had many days warm enough to visit the beach and today is no exception as it’s been rather dull and overcast.

The blog title is also about my card for this weeks Less is More challenge, which is ‘Sand’.

I had some scraps out on my desk and some new card blanks I picked up from Anna Maries Designs on my trip to the Sincerely Yours Show in Portsmouth on Sunday. So it would have been silly not to have a little play. Here is my effort….

Beach Card (6)

I cut an aperture into the front of my card blank and placed strips of card behind it to make the sand, water and sky. I doodled a few birds in the sky and used a mask, ink duster and yellow ink to create the sun. The waves were doodled with a Quickie Glue Pen and covered with clear glitter. Lastly I added a Paula Pascual for Personal Impressions sentiment using Coffee Bean Brilliance Ink and a little boat made from scraps of card cut freehand with some scissors.

Now to me it seems CAS but I’m not sure whether it has enough white space, let me know what you think.

I would also like to enter this card into the following challenges:

Thanks for stopping by

Lisa

Tuesday, 9 April 2013

Hot Air Balloons

Morning All. Hope everyone had a lovely weekend. I had a nice quiet relaxing one, did a little bit of crafting, a little bit of cooking and took the wee ones out to the park for some fresh air.

Got half hour in the craft room yesterday evening so I have a little bit of Whimsy Inspiration for you this morning. I’ve used a digi from April’s release Hot Air Balloons from Moon Cookie Gallery.

MCG Hot Air Balloons (1)

I’ve also made this card for the current Less is More challenge of Lime and Black.

The first balloon and computer generated sentiment are printed onto smooth white card,  trimmed, mounted on black card and fixed to a white 5” by 7” card blank. The second balloon has also been printed on smooth white card, cut out and fixed to the card base with foam pads. Both balloons have been coloured with Spectrum Noir pens and a touch of Lime Green Stickles.

And for anyone that’s interested here’s a recent picture of my Littlest One…12 weeks old yesterday :-)

IMG_6707

Thanks for stopping by

Lisa

Related Posts Plugin for WordPress, Blogger...